Mitutoyo Measurement Service Aids FeTu’s Developments
As the world's leading manufacturer of precision measuring equipment Mitutoyo offers a comprehensive variety of metrology products, ranging from the humble caliper to advanced vision measuring systems and 3D coordinate measuring machines. Now in its 40th year of operation, Mitutoyo UK supports its customer base, not only with the supply of precision products, but also with the provision of a wide range of first-class complementary services. In addition to product training, IT support, calibration and repair resources, Mitutoyo UK also offers highly-efficient sub-contract measuring services.
 Although Mitutoyo’s Measurement Services Department serves the sub-contract measurement needs of numerous large, blue-chip businesses, the assistance currently being afforded to FeTu Ltd helps to illustrate the inspection work performed by Mitutoyo for small and medium sized companies. Established in 2016, FeTu Ltd is an innovation driven enterprise that has developed a revolutionary ‘green’ energy device that targets carbon reductions across a broad range of systems and industries. FeTu’s disruptive technology is a versatile ‘continuous positive displacement’ machine that is suitable for a wide range of applications.
The Elland, West Yorkshire based company’s lightweight and scalable technology uses just two moving parts to operate four anti-phased compression chambers and offers low-loss conversion from potential to kinetic energy.
As a relatively young dynamic business that is involved in the design, development and testing of its ‘roticulating’ technology, FeTu currently subcontracts all of its manufacturing activities. Given the extremely demanding dimensional tolerances and the critical geometries of the device’s two moving parts, FeTu Founder and CEO, Jon Fenton recently searched for a source of independent, high-precision inspection. The answer to FeTu’s precision inspection needs was found in Mitutoyo’s Measurement Services.
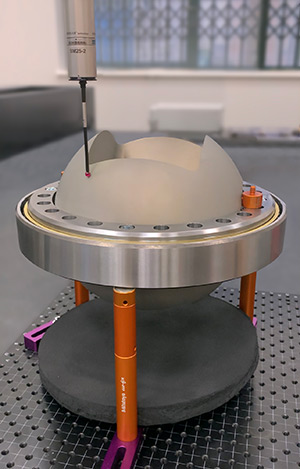
Prior to the assembly and testing of each new iteration of FeTu’s designs, having previously written the required CMM software programs, Mitutoyo’s staff use one of the company’s advanced CRYSTA-Apex S Series CNC coordinate measuring machines to perform a range of in-depth, high-precision inspection routines on FeTu’s components. Following each CMM inspection routine comprehensive inspection reports are generated and supplied to FeTu allowing further developments to take place. FeTu’s association with Mitutoyo’s Measurement Services Department has resulted in a range of tangible benefits. FeTu Founder and CEO, Jon Fenton explained. “As tradition has it, in visualising an ‘engine’, ‘pump’, ‘compressor’, ‘turbine’ or ‘expander’; we imagine five discreet machines which all appear and function in very different ways. The beauty of our unique technology is that it is able to accomplish each of these functions in a much more efficient way than they are performed by current, traditional technology.
“The 2 dynamic parts of the FeTu system do not make contact but run so close to each other as to make an effective a seal. The sealing effect is aided by the leakage path lengths being so long that they stagnate flow. To ensure that an efficient seal is achieved, the system’s 2 high precision moving parts have extremely tight dimensional tolerances. Therefore, a major aspect of our design, development and testing activities has been achieving the required levels of accuracy that allows efficient and reliable sealing to be accomplished.
“The high-precision CMM inspection work undertaken by Mitutoyo and the comprehensive inspection reports supplied to us, related to the accuracy of the moving parts and other critical aspects of our designs, has been invaluable. In addition, the speed and in-depth nature of the feed-back we have received from Mitutoyo has helped us to truncate our developments times.”
Mitutoyo’s Measurement Services Department supports companies across the UK that are involved in a wide variety of industrial sectors. Typically, businesses are helped on occasions when their QA inspection demand surpasses their in-house capacity. Also, when the need for component measurements exceeds the ability or physical capacity of companies’ metrology equipment. As Mitutoyo is usually contacted when urgent situations occur, the departments skilled staff are able to react with speed to ensure the delivery of rapid, precise, and cost-effective outcomes. Mitutoyo Measurement Services Department Manager, Andrew Fifield concluded. “Our team uses a range of state-of-the-art metrology equipment that enables the most demanding of components to be measured, profiled, analysed, scanned, programmed or compared to CAD. In addition, we are able to accommodate all QC, QA production or SPC requirements.
“Having liaised with Jon Fenton of FeTu, we concluded that the use of an advanced Mitutoyo CRYSTA-Apex S Series CMM was the ideal means of achieving the required levels of precision and the speed of feed-back needed. Also, given the CMM’s use of Mitutoyo’s MCOSMOS software we were able to create customised and detailed inspection reports that met FeTu’s demanding needs.
“It appears that Jon Fenton and FeTu are on the verge of introducing a phenomenal technical breakthrough that has applications across many industrial sectors. All at Mitutoyo are proud to have played a small, but important part in FeTu’s technology developments and look forward to witnessing the company’s immanent success.”